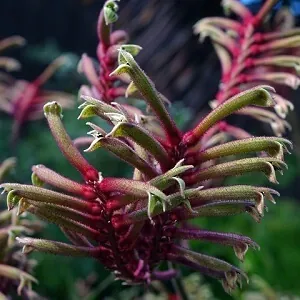
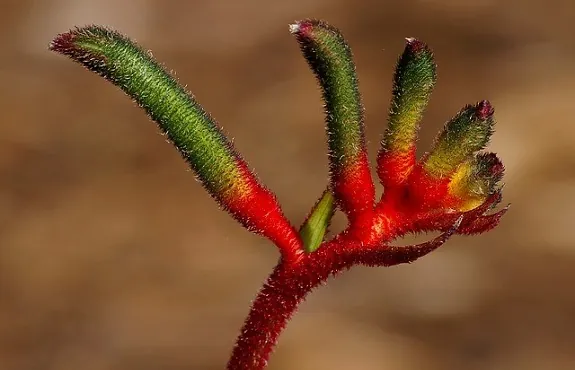
 Kangaroo Paws (Anigozanthos species) are iconic Australian native plants known for their unique, furry flowers that resemble a kangaroo’s paw. These striking plants are not only beautiful additions to gardens but also thrive in large garden planter boxes, making them perfect for patios, balconies, and small spaces. This guide will provide comprehensive information on successfully growing Kangaroo Paws in garden pots.
Choosing the Right Variety Native Plant
When selecting Kangaroo Paws Varieties for container growing, consider the following:
- Size: Smaller varieties like ‘Bush Diamond’ and ‘Bush Pearl’ are ideal for pots.
- Climate adaptability: Choose species suited to your local climate.
- Colour: Kangaroo Paws come in various colours, including red, yellow, green, and pink.
Pot Plant Selection and Preparation
Proper pot selection is crucial for the health of your Anigozanthos:
- Size: Choose a pot one or two sizes larger than the nursery pot.
- Material: All materials work well, but higher quality fibreglass, concrete, or stone will last the longest. Further Reading: Choosing the Right Garden Pot Material
- Drainage: Good drainage is essential. Check and enlarge drainage holes if necessary.
Soil and Potting Mix For Kangaroo Paws in Planters
Well-draining soil:
- Use a premium potting mix designed for native plants.
- Add perlite or coarse sand to improve drainage if needed.
- Avoid heavy, water-retaining soils.
Potting Up Planting Process
Follow these steps when planting your Anigozanthos:
- Fill the pot partially with potting mix.
- Remove the plant from its nursery pot and gently loosen the roots.
- Place the plant in the new pot at the same depth it was in the original container.
- Fill around the plant with potting mix, firming gently.
- Water thoroughly to settle the soil.
Kangaroo Paws Plant Sunlight Requirements
They thrive in full sun:
- Place pots in a location that receives at least 6 hours of direct sunlight daily.
- In extremely hot climates, provide some afternoon shade to prevent leaf burn.
Garden Pot Watering
Proper watering is crucial for potted Anigozanthos:
- Water deeply but infrequently:
- Allow the soil to dry out slightly between waterings .
- This mimics their native habitat conditions and encourages deep root growth.
- Increase watering frequency during hot, dry periods:
- Kangaroo paws may require more frequent watering in hot weather to stay hydrated .
- They typically need about 10-20mm of water per week, but this may increase in hot conditions .
- Water at the base of the plant:
- Avoid getting water on the foliage to prevent fungal diseases .
- Focus on watering the soil around the roots.
- Water deeply:
- Ensure water penetrates the soil to reach the roots .
- This encourages a strong, deep root system.
- Monitor soil moisture:
- Check the top inch of soil – if it feels dry, it’s time to water .
- Water in the morning:
- This allows time for excess water to evaporate and reduces the risk of fungal growth.
- Use mulch:
- Apply a layer of organic mulch around the base of the plant to help retain moisture and keep roots cool.
- Avoid overwatering:
- While kangaroo paws need more water in hot weather, overwatering can lead to root rot .
- Ensure good drainage to prevent water logging.
Remember, it’s important to balance increased watering needs in hot weather with the plant’s preference for well-drained conditions. Always adjust your watering based on specific weather conditions, soil type, and the individual plant’s needs.
Anigozanthos Plant Fertilising
Kangaroo Paws benefit from regular feeding:
- Use a slow-release fertilizer formulated for native plants.
- Apply fertilizer in spring and late summer.
- Avoid high-phosphorus fertilizers, as Kangaroo Paws are sensitive to phosphorus.
Kangaroo Paws Pruning and Maintenance
Regular maintenance keeps your potted Anigozanthos healthy and attractive:
- Remove spent flower stems at the base.
- Cut back foliage to ground level after flowering or in early autumn.
- Remove any dead or yellowing leaves throughout the growing season.
Kangaroo Paw Pest and Disease Management
While generally hardy, they can face some issues:
- Watch for aphids and treat with insecticidal soap if necessary.
- Monitor for fungal diseases, especially in humid conditions.
- Ensure good air circulation to prevent fungal problems.
Seasonal Care
Adjust your care routine throughout the year:
- Spring: Increase watering and begin fertilising as new growth appears.
- Summer: Maintain regular watering and deadhead spent blooms.
- Autumn: Reduce watering and prepare for winter dormancy.
- Winter: Protect from frost if necessary and minimise watering.
Propagation
Propagate your Kangaroo Paws to expand your collection:
- Division: Divide large clumps in spring or autumn.
- Seeds: Sow seeds in spring, but be aware that hybrids may not come true from seed.
Overwintering
In colder regions, take steps to protect your potted Kangaroo Paws:
- Move pots to a sheltered location or indoors if temperatures drop below freezing.
- Reduce watering significantly during winter dormancy.
- Apply a layer of mulch to protect the crown of the plant.
Troubleshooting Common Issues
Address problems promptly to maintain plant health:
- Yellowing leaves: Often a sign of overwatering or poor drainage.
- Lack of flowers: Insufficient sunlight or nutrients may be the cause.
- Wilting: Check for underwatering or root problems.
Companion Planting in Containers
Create attractive pot arrangements by pairing Kangaroo Paws with:
- Other Australian natives like Grevillea or Callistemon.
- Drought-tolerant succulents for texture contrast.
- Trailing plants to soften the pot edges.
Using Kangaroo Paws as Cut Flowers
Enjoy your Kangaroo Paws indoors:
- Cut stems when flowers are partially open.
- Remove foliage below the water line.
- Change water regularly to prolong vase life.
Environmental Benefits
Growing Kangaroo Paws in pots contributes to urban biodiversity:
- Attracts nectar-feeding birds and insects.
- Requires less water than many exotic plants.
- Promotes awareness of native flora.
Conclusion
Growing Kangaroo Paws in garden pots is a rewarding experience that brings a touch of Australian wilderness to any outdoor space. With proper care, these unique plants will thrive and provide stunning displays of colourful, furry flowers. Remember to provide well-draining soil, plenty of sunlight, and appropriate water and nutrients. By following the guidelines in this comprehensive guide, you’ll be well-equipped to enjoy healthy, vibrant Kangaroo Paws in your container garden.


It’s January and I haven’t done anything with my potted Kangaroo Paw. Can I trim it all back and put under a covered patio now?
Hi Renee
Yes, you can trim your potted Kangaroo Paw back and place it under a covered patio in January. Here are some key points to consider:
Timing for Pruning
Pruning Timing: While the best time to prune Kangaroo Paws is typically after their flowering season, which is usually late summer to early autumn, it is still acceptable to prune them now, especially if they appear overgrown or have finished flowering. Trimming back the plant can encourage new growth and help maintain its shape.
How to Trim
Cutting Back: You can cut the plant back to about 10-20 cm above the ground. This will help rejuvenate the plant and promote healthy new growth from the rhizome. Be careful not to cut into the rhizome itself, as this can harm the plant.
Remove Dead Material: Make sure to remove any dead or damaged leaves and spent flower stalks to improve the overall health and appearance of the plant.
Relocation to Covered Patio
Protection from Elements: Moving your Kangaroo Paw under a covered patio can provide protection from extreme weather conditions, such as intense heat or frost. This is particularly beneficial if you live in an area with harsh summer conditions or unexpected cold snaps in winter.
Light Requirements: Ensure that the covered area still allows for adequate sunlight. Kangaroo Paws thrive in full sun, so placing them where they can receive at least 6 hours of sunlight daily is essential for their health and flowering.
Post-Pruning Care
Watering: After pruning, continue to monitor the moisture levels in the pot. Water the plant thoroughly but allow the soil to dry slightly between waterings to prevent root rot.
Fertilising: Consider applying a slow-release fertiliser designed for native plants after pruning to support new growth.